Step By Step
This tutorial will help you step by step to start building a web site.You'll download a simple kit that contains images for the site.
Then you'll choose a tool and create a website using simple Copy and Paste exercises.
If you complete the lessons from start to finish you will be able to take any one of our other templates and progress to a more sophisticated website.
I will also provide links to relevant information along the way.
Read the information and return to the tutor.
Learn to create a website Step by Step!!
The Website
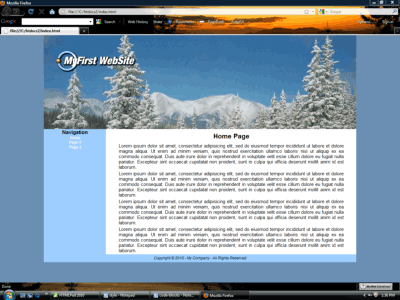 This is the simple 3 page website you're going to build.
Don't worry about the picture at the top or the colors for now.
When you finish the tutor, you'll know how to change everything.
Visit Demo
Step #1 - Get Organized
Create a special folder to store your web pages.Nothing is more confusing than an unorganized website.
Create a folder on your c: drive and name it htdocs. Store your web pages and style sheets in that folder.
Create another folder inside of the htdocs folder and name it images. Download the images kit, extract and save the images in the c:\htdocs\images folder.
For Now: - Download Images Kit
A Word to the Wise: If you don't know how to perform simple computer operations like creating folders, extracting zip files and copy/paste routines, you probably don't have enough computer savy to build websites from scratch. Learn to do those things before you start this tutor!
Step #2 - Grab Your Tool
I recommend using either a simple text editor like NotePad or an HTML editor for completing this tutorial.If you want to start with a free HTML editor, try AlleyCode or NoteTab Light
If you use AlleyCode DO NOT use the SyncroView feature.
If you want to use the same HTML editor that we use to create and maintain our websites, Download Free Trial of HTMLPad 2011
Note: I strongly discourage the use of WYSIWYG editors for learning to build websites. If you want to use an editor that doesn't require you to learn code, then find a service that provides an online editor and use their WYSIWYG.
Step #3 - the Basic Page code
The basic HTML page code that we're going to use is provided below.Copy and paste the code into a new BLANK page, that you start with your text or HTML editor.
<!DOCTYPE HTML PUBLIC "-//W3C//DTD HTML 4.01 Transitional//EN"  "http://www.w3.org/TR/html4/loose.dtd">
<html>
<head>
<link rel="stylesheet" href="style.css" type="text/css">
</head>
<body>
<div id="center-page">
<div id="heading">
</div>
<div id="main">
<div id="left">
</div>
<div id="right">
</div>
</div>
<div id="footer"></div>
</div>
</body>
</html>
Save the web page in your htdocs folder as template.html
If your editor doesn't have a blank page option, just use the new page option, delete the code it provides and add the code shown above.
Related reading:
Basic HTML Page
The Division Tag
Note: If you were to Preview your web page or look at it in a browser, you would see just a blank page. Let's change that.
Step #4 - Add a Style sheet
Your basic HTML code includes a line of code that connects your web page with a style sheet.<link rel="stylesheet" href="style.css" type="text/css">To show you how powerful a style sheet can be let's create one called style.css, add a small block of code and make our web page visible.
With your text or HTML editor create another blank page and save it in the htdocs folder as style.css.
Copy and Paste this code into your blank style sheet and save it again:
 #heading {
width: 1000px;
height: 300px;
background-image: url(images/mountain-snow.jpg);
}
After you save the style sheet the second time, Preview your web page.
What we did
If you did the related reading on the division tag, you should understand that we added the width and height settings to the division named heading and then added a background image named mountain-snow.jpg.
Related reading:
Style Sheets
Using Images
How to Change the Background Image in the Header
Step #5 - Center Page and Define Additional Divisions
Except for adding content, most of the work that we'll do in developing our web page will take place in the style sheet. If you keep your HTML code simple and concise it will make your web site much easier to manage and redesign.A...Copy and paste this block of code to your style sheet at the very top:
 * {
padding: 0 0 0 0;
margin: 0 0 0 0
}
This removes all default padding and margins from your design.
Save the style sheet.
B...Now let's center the web page.
Copy and paste this block of code ABOVE the block for the heading division:
 #center-page {
width: 1000px;
margin: 0 auto 0 auto
}
Save the style sheet and preview the webpage.
The center-page division is called a container division. All major divisions nested within the center-page will be set to 1000 pixels in width. Besides heading the other 2 are main and footer.
The division named main is also a container. The divisions left and right are nested within it. They will be used to create 2 columns in the content section of the web page.
C...Copy and paste this code below the heading division in the sytle sheet.
 #main {
width: 1000px;
background-image: url(images/2col-bkg.gif);
float:left
}

#footer {
width: 1000px;
height: 25px;
background-color: #99ccff;
float: left;
}

#left {
width: 200px;
float: left
}

#right {
width: 800px;
float: left
}
Save the style sheet and Preview the web page.
Not much change yet so let's add some content to the divisions.
Step #6 - Adding content
We need to add some content to all of the divisions so that they will show up when we Preview the web page. We'll add 2 paragraphs to the right division. The length of the web page will expand to accomodate the amount of content added. You could add six paragraphs and the page would increase in height.We'll add just a single word to the left and footer divisions, just to make them visible.
A...Copy and paste to the right division:
<div id="right">
paste paragraphs here
</div>
<p>Lorem ipsum dolor sit amet, consectetur adipisicing elit, sed do eiusmod tempor incididunt ut labore et dolore magna aliqua. Ut enim ad minim veniam, quis nostrud exercitation ullamco laboris nisi ut aliquip ex ea commodo consequat. Duis aute irure dolor in reprehenderit in voluptate velit esse cillum dolore eu fugiat nulla pariatur. Excepteur sint occaecat cupidatat non proident, sunt in culpa qui officia deserunt mollit anim id est laborum.</p> <p>Lorem ipsum dolor sit amet, consectetur adipisicing elit, sed do eiusmod tempor incididunt ut labore et dolore magna aliqua. Ut enim ad minim veniam, quis nostrud exercitation ullamco laboris nisi ut aliquip ex ea commodo consequat. Duis aute irure dolor in reprehenderit in voluptate velit esse cillum dolore eu fugiat nulla pariatur. Excepteur sint occaecat cupidatat non proident, sunt in culpa qui officia deserunt mollit anim id est laborum.</p> B...Type the word Navigation in the left division as shown:
 <div id="left">
Navigation
</div>C...Type the word Footer in the footer division as shown:
<div id="footer">Footer</div>Save template.html and Preview it in your browser.
Step #7 - Format the Text
To improve the appearance of the content in the right division, we'll add a simple block of code to the style sheet.A...Copy and Paste into style sheet:
 #right p {
font-family: arial, verdana, serif;
font-size: 11pt;
font-weight: 500;
text-align: justify;
margin: 4px 40px 4px 40px;
}
Save the style sheet and Preview the web page.
Things look a little better but the text seems to be lost in a sea of white.
Let's add some more color to break up the white. Normally, we would add this at the top of the style sheet. For now you can add it anywhere.
B...Copy and paste into style sheet:
 body {
background-color: #6B8FB3
}
Save the style sheet and Preview the web page.
Related reading:
Using Color
Using fonts
Step #8 - Adding a Logo
Before we finish the Left and Footer divisions, let's add a logo to our heading division.To do this we'll add code to the web page and then format the image using the style sheet.
We've already created a logo for this site. You can order one for the website you make from our Free Graphics Gallery when you get ready.
A...Copy and paste this block of code into the heading division of the web page code.
<img src="images/header.gif" alt="My first website">Save the web page and Preview.
To size and position the image,
B...Copy and paste this block of code into the style sheet:
 #heading img {
width: 254px;
height: 67px;
margin: 50px 0 0 40px;
border: none
}
Save the style sheet and Preview the web page.
Note: If you use a generic name for your logo image and set its dimensions in the style sheet, it makes the redesign process of your website a simple matter of making changes to the style sheet.
Step #9 - Finish the Footer
You can provide valuable information to visitors and search engines in your footer. You can place your company name, address and even contact information.We're going to add a simple one liner with copyright information.
Once again we'll add a line of code to the web page and then format it in the style sheet.
A...Delete the word Footer and Add this line of code in the footer division:
<address>Copyright © 2010 - My Company - All Rights Reserved</address>Save web page and Preview.
B...Add this block of code to the style sheet:
 #footer address {
font-family: arial, verdana, serif;
font-size: 9pt;
text-align: center;
padding: 4px 0 0 0
}
Save the style sheet and Preview the web page.
Step #10 - Finish the Left Division and Create New Web Pages.
Let's add a Navigation device to our Left division. That will complete our template page, which we can use to create the actual pages of our website.We'll add the HTML code and then update the sytle sheet.
A...Delete the word Navigation and add this block of code to the Left division:
 <h2>Navigation</h2>
<p><a href="index.html">Home</a><br>
<a href="page2.html">Page 2</a><br>
<a href="page3.html">Page 3</a></p>
Save the web page and Preview.
B...Copy and Paste this block of code to the style sheet:
 #left h2 {
font-family: arial, verdana, serif;
font-size: 12pt;
font-weight: 700;
text-align: center
}

#left p {
font-family: arial, verdana, serif;
font-size: 9pt;
text-align: center
}

#left a {
text-decoration: none;
font-weight: 600;
color: #ffffff;
background-color: transparent
}

#left a:hover {
text-decoration: underline;
font-weight: 600;
color: #6B8FB3;
background-color: transparent
}
Save the style sheet and Preview the web page.
For our purposes, we've finished our template. We are now ready to create the actual pages of our website.
Step#11 - Create 3 New web Pages
Our Navigation device can be used to access 3 web pages.Their filenames are:
index.html
page2.html
page3.html
A...Use the SaveAs function on your editor and save template.html 3 times.
1...The first time save it as index.html
2...The second time save it as page2.html
3...The third time save it as page3.html
You now have the 3 pages that can be viewed using your navigation device.
Problem is that right now all the web pages are exactly alike.
Let's do something about that.
B...Open index.html in your editor.
In the right division above the first paragraph Add:
<h1>Home Page</h1>Save index.html
C...Open page2.html in your editor.
In the right division above the first paragraph Add:
<h1>Page Two</h1>Save page2.html
D...Open page3.html in your editor.
In the right division above the first paragraph Add:
<h1>Page Three</h1>Save page3.html
E...Add this block of code to the style sheet:
 #right h1 {
font-family: arial, verdana, serif;
font-size: 16pt;
text-align: center;
margin: 10px 0 10px 0
}
Save the style sheet and Preview index.html
Your 3 page website is complete. You can now load a web page in your browser and view all 3 pages using the Navigation device in the left column.
The techniques used here can be employed to create any website. First create a complete template with background images, links and footer information. Then use the template to create the actual pages of your website.
Building a Website
Step by Step
Adding an Image
Most HTML editors have a function for adding images to the content of your web page.If you are using NotePad or another text editor, here's the code:
<img src="images/filename" alt="Alternate text is required for W3C compliance." width="300" height="200" align="left" border="0">Save your picture in your images folder.
Place the proper filename in the code
Supply some alternate text describing the image
Insert the proper widthand height dimensions
The align code is deprecated but will work for beginners: left or right
Set border to Zero.
The code to set an image in a paragraph looks like this:
<p><img src="images/filename" alt="Alternate text is required for W3C compliance." width="300" height="200" align="left" border="0">The text of the paragraph would be placed here immediately following the image code.</p> How to Change the Header Background
Want to change the background image in the header? It's very simple.If you've got any simple photo editing software, it shouldn't be a problem.
Set the width of your new image to 1000 pixels and crop it to the desired height.
Save your new background image in your htdocs/images folder.
Change the style sheet to reflect the name of the image and the new height setting:
 #heading {
width: 1000px;
height: 300px;
background-image: url(images/mountain-snow.jpg);
}
#heading {
width: 1000px;
height: 265px;
background-image: url(images/new-image-name.jpg);
}That's about it.
If you need a good free photo editor, get a copy of PhotoScape 3.5
Other Necessaries for your Template
To save time add a Title and Meta tags for description and keywords to your template. Fill in the information for each web page that you create using the template.Add code to template as shown:
<head>
<title>Page title with keywords</title>
<meta name="description" content="description of content with keywords">
<meta name="keywords" content="keywords, or phrases, separated by commas">
SR:-createafreewebsite
No comments:
Post a Comment