
This tutorial will show you how to create a simple additive two color Technicolor filter for Photoshop using Filter Forge plugin. Filter Forge is a fantastic tool to create your own Photoshop filters without writing a single line of code or know how to program in any language.
You don’t need to buy FilterForge plugin to follow this article. You can download a 30 day fully functional demo here with absolutely no restrictions. If you want to know about many other Photoshop plugins that offer fully functional trials, just read my previous article: 22+ Stunning Commercial Photoshop Plugins With Fully Functional Demos.
According to Wikipedia, Technicolor was the most widely used color motion picture process in Hollywood from 1922 to 1952 and was best known for its hyper-realistic, saturated levels of color. Although there were several different Technicolor processes, in this article we will focus on the most simple one of all of them all, the additive two color Technicolor process. Basically, this process involves extracting the RED and GREEN channels of an image, tinting them with red and cyan colors and mixing them back to produce an elegant and quite realistic looking color effect.
If you want to get more technical information about Technicolor, you can visit the Widescreen Museum for an in depth technical explanation and a bit of history about this subject. You can also visit Martin Scorsese’s Aviator Movie FX web site to learn how two and three color state of art Technicolor was used in the movie.
Additive Two Color Technicolor Filter for Photoshop
Open the image you want to convert in Photoshop. As usual, all photo effects work better on good photos. This photo was purchased from iStockPhoto.

Go to FILTER > FILTER FORGE > FILTER FORGE… Click on the FILTER EDITOR button located at the top right corner of the FilterForge window. A small window will show up in the middle of the screen. Select CREATE A NEW FILTER and then click on the OPEN FILTER EDITOR button.
A new window will open. Filter Forge allows you to create a simple filter (those you apply to an image) or a surface (basically a texture or a pattern). In this case we are going to create a simple fIlter, so you must select that on the pulldown menu at the left of the screen. Then, go to the top right of the screen and click on COMPONENTS to show the components list:
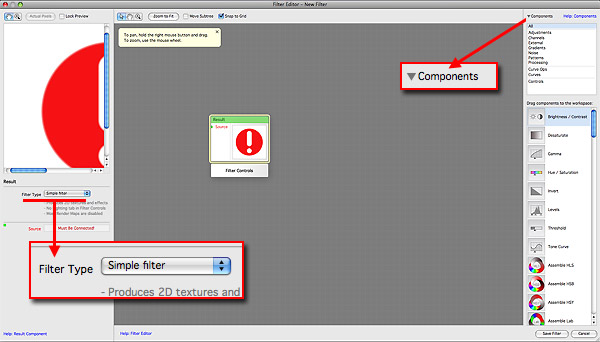
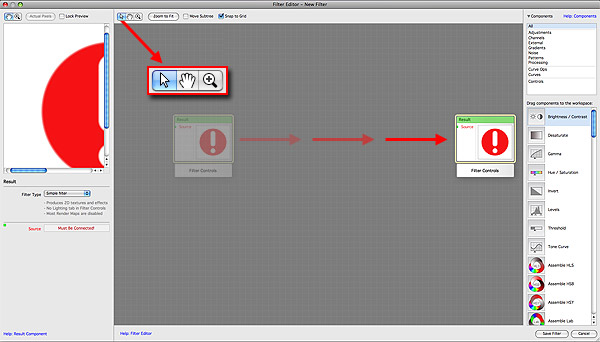
In the center of the window, there is a gray area where the components will be placed and organized. Components can be placed by dragging them from the COMPONENTS LIST or simply by double clicking on the name. You can select and move the components using the ARROW icon located at the top left of the gray window. You can move or PAN the work area by selecting the HAND icon located besides the ARROW tool.
When building a filter, the amount of components is usually large. You will be moving components and panning the work area a lot of times until you have your filter complete.
Components are like Lego bricks you use to build the filter. Components are connected between them according to the filter needs. You will see that later in this tutorial.
The first component you see is the RESULT component. It is always placed by default and you can’t build a filter without that component. It simply outputs the result of the filter. Move it to the right just to leave more space to build our Technicolor filter.
Now it is time to add the first component. Since we are building a photo filter, then we need an input image. This input image is the one that is located in the LAYER that was active at the moment we opened Filter Forge.
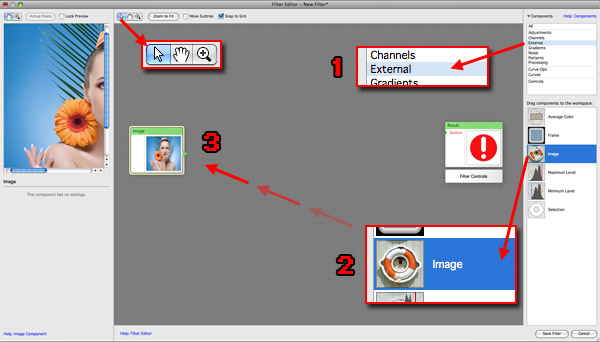
1 – Select the ARROW tool and then click EXTERNAL in the components list
2 – Click on the IMAGE component in the EXTERNAL COMPONENTS list.
3 - Drag the component to the leftmost side of the gray area.
2 – Click on the IMAGE component in the EXTERNAL COMPONENTS list.
3 - Drag the component to the leftmost side of the gray area.
You have placed the first component of the Technicolor filter. Notice the little green arrow located at the right side of the component. This arrow is used to connect this component to another. Let’s see that in the next step.
At this point it would be better to save our filter and give it a name. To do it just go to FILE > SAVE FILTER AS…, give it a name and click on the SAVE button. You can now continue working. Remember to save the filter during the tutorial.
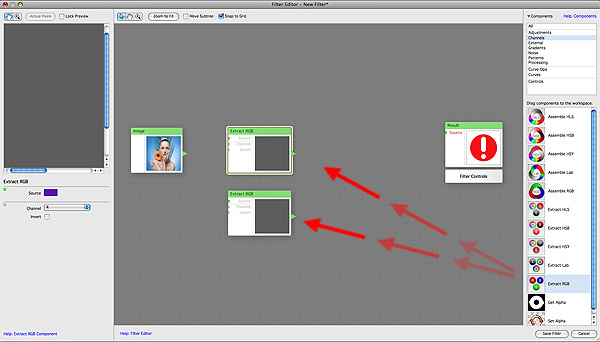
As we said before, the basic Technicolor process was based in extracting the RED and GREEN channels of an image. There is a component in Filter Forge to do so. Click on CHANNELS in the categories list and then drag two copies of EXTRACT RGB component from the COMPONENTS list. This component lets you specify an image source and select a channel to be extracted. The output of this component is one of the three RGB channels.
Now we must connect the IMAGE component to both EXTRACT RGB components. Let’s start with the first one.
Click on the little green arrow at the right side of the IMAGE component and drag it to the little green rectangle labeled SOURCE located at the left side of the first EXTRACT RGB component.
Click on the little green arrow at the right side of the IMAGE component and drag it to the little green rectangle labeled SOURCE located at the left side of the first EXTRACT RGB component.
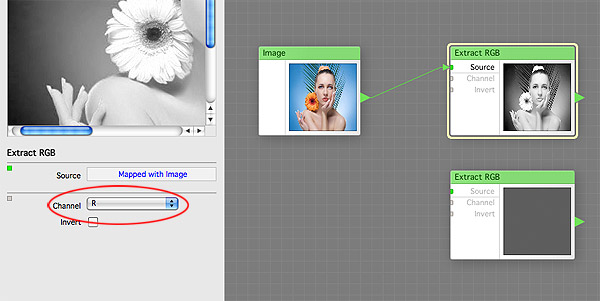
Click on the first EXTRACT RGB component (a light yellow border will tell you that this component is selected). You will see that the leftmost column isn’t showing the color image anymore. Now it shows a grayscale image. Below the preview, there are a couple of settings. The one we need to set is the CHANNEL setting. Just set it to show the red channel by selecting R (which is by coincidence, the default setting).
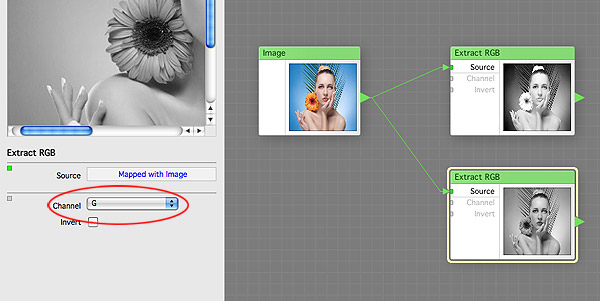
Now, repeat the same with the second EXTRACT RGB component. Connect the IMAGE component by dragging the little green arrow right to the little green rectangle labeled SOURCE located at the left side of the second EXTRACT RGB component. Now click on this component and set the channel to green by selecting G from the component’s setting CHANNEL pulldown menu.
To become more familiar with the components, just click on each one of the three components we placed and check how the preview image and the settings, located at the left panel, change for each component.
At this point we have extracted the RED and GREEN channel from the image. Now we have to tint them with a different color each. The original Technicolor process uses red and cyan to tint the channels. But since Filter Forge allows us to create an interface for the plugin, we can set up an user definable color control. This way we can try different color combinations.
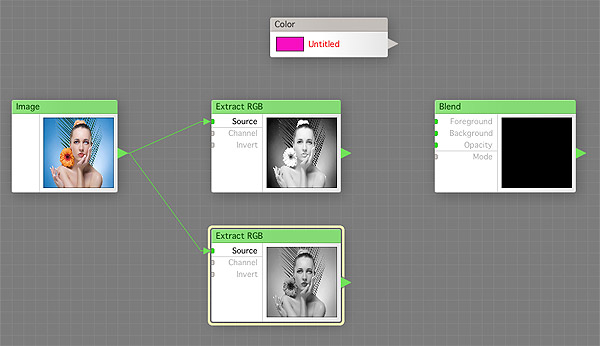
To tint a channel in Filter Forge, we have to add a COLOR CONTROL component for the tint color, and a BLEND component to mix the color and the channel.
Click on PROCESSING components category. Then click and drag a BLEND component to the work area.
Click on the CONTROLS components category. Then click and drag a COLOR CONTROL component to the work area.
To understand what we are going to do, let’s imagine you are working on Photoshop. On one layer you have a grayscale image (the EXTRACT RGB component in this case) and a solid color layer located above (the COLOR CONTROL component in this case). To blend those two layers you have to go to the blending options and select a blending mode. That would be of course if we were working directly on Photoshop.
Here, in Filter Forge, you blend two layers by using the BLEND component and setting the upper layer in the foreground and the lower layer in the background.
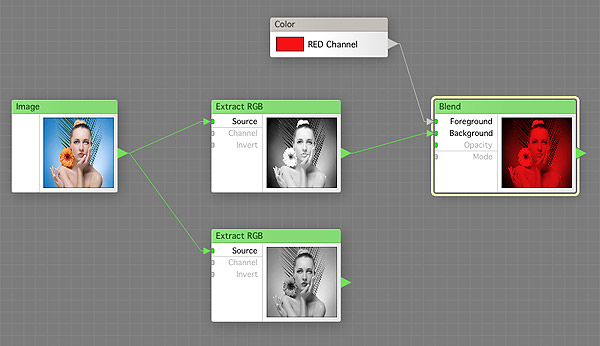
So, let’s drag an arrow from the COLOR CONTROL component to the FOREGROUND setting of the BLEND component.
Then drag an arrow from the first EXTRACT RGB component to the BACKGROUND setting of the BLEND component.
Click on the BLEND component and set the blending mode to MULTIPLY as the opacity to 100% in the components settings panel at the left.
Now click on the COLOR CONTROL component and set red (255,0,0) as the color. Give it a name. In this case we are going to use RED Channel. That will be the name the control will have in the filter interface.
Repeat the same with the green channel, but set cyan (0,255,255) instead of red as the tint color and name it GREEN Channel.
At this point we have extracted the RED and GREEN channels from the image, and tinted them of RED and CYAN. We also added two color controls to let the user change the tinting colors. 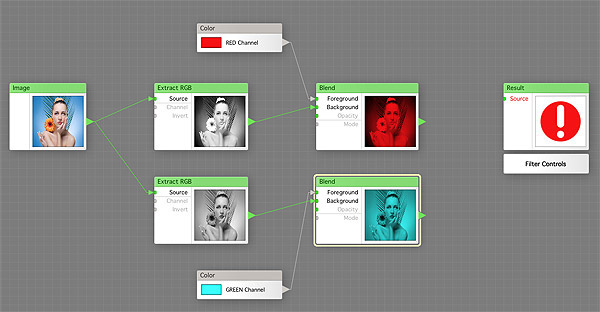
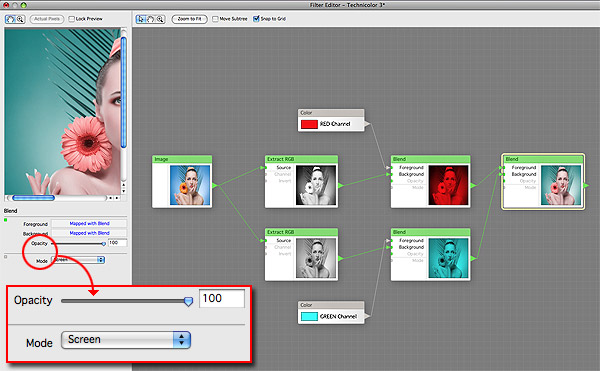
Now let’s blend both channels to obtain the Technicolor effect. To do so, add another BLEND component to the work area and connect the RED component to the foreground and the CYAN component to the background. Then, click on the BLEND component and set the blending mode to SCREEN and the OPACITY to 100% in the settings panel located at the leftmost column:
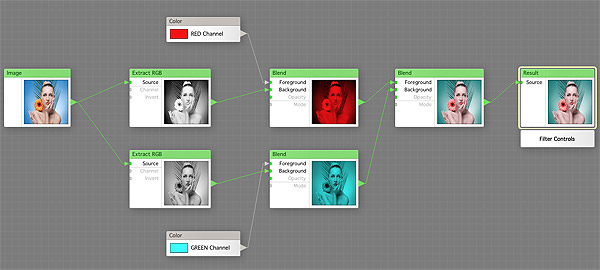
The last step of this tutorial is to connect the last component (the BLEND component) to the RESULT component. The image below shows the complete diagram of this filter:
We are done! Now save the filter and go to FILE > EXIT FILTER EDITOR. The Filter Editor window will close. We are now in the main Filter Forge window. You will se the effect you have just created applied to the image.
Click on the SETTINGS button located at the left panel of the window to show this filter controls. You can change the colors here, or you can play a bit by clicking on the NEXT VARIANT button. This button will randomize the settings giving surprising results.
Click the APPLY button located at the bottom right of the window to apply the effect and return to Photoshop.
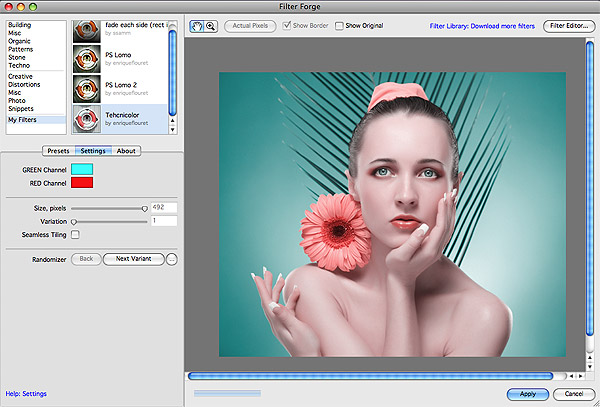
Here’s the result.

The following images were created using different tinting colors:
Original Image
RED Channel (253,35,80) / GREEN Channel (52,250,185)

RED Channel (251,77,105) / GREEN Channel (145,213,225)

RED Channel (235,9,122) / GREEN Channel (25,250,27)

RED Channel (255,213,213) / GREEN Channel (0,150,255)

Hope this tutorial helped you to understand how you can create your own Photoshop filters with Filter Forge. Although this was a simple example, it is very effective. If you want to know how to create a surface filter with Filter Forge then you may want to read a tutorial I wrote some time ago about Creating a wet and muddy rocks textures with Filter forge.
Don’t forget to download you 30 days fully functional Filter Forge demo. Good luck!
No comments:
Post a Comment