"Daguerreotypes - The Louis Daguerre Effect"\
 The world’s first photographic process was announced in Paris in 1839 by Louis Daguerre. It used a silver-plated copper sheet that was sensitized with iodine, exposed, and then developed in mercury vapor. Early images were of architectural subjects or landscapes, but soon the process was also used for portraiture, and it became particularly popular in France and America.
Daguerreotypes were positive images, one-offs, and the process was obsolete within a decade, as soon as new techniques allowed multiple photographs to be printed from negatives. But if you ever get the opportunity to compare early photographs in museums or exhibitions, it would be surprising if you didn’t find the Daguerreotypes to be some of the most magical objects on display.
Early Daguerreotype exposure times were long, so moving subjects such as water and people usually appeared blurred. Photoshop’s Motion Blur filter is ideal for simulating this, but requires a little care in its application because Daguerreotypes recorded other, static objects in fine detail.
The other major characteristic of the Daguerreotype, its metal base, is tougher to imitate: the effect is as if the picture were printed onto a mirror. I didn’t have any success using an inkjet printer to print onto kitchen foil, promising though this experiment seemed, but there are ways to imitate metallic finishes in Photoshop. Certainly you need to print onto high-gloss paper rather than a surface with a matte or textured finish. The staining and other discoloration around the picture edges can also be added artificially in Photoshop, but it’s quicker and more realistic to scan real materials and use them as layers within the picture. Metallic objects will be most suitable for the Daguerreotype, but once you get the hang of this technique, you can apply it to all sorts of photographs.
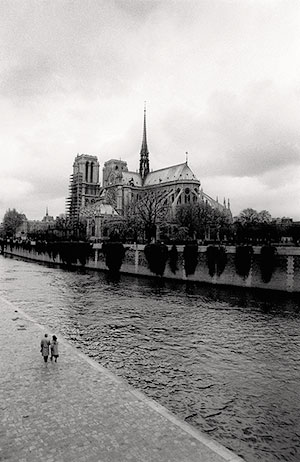
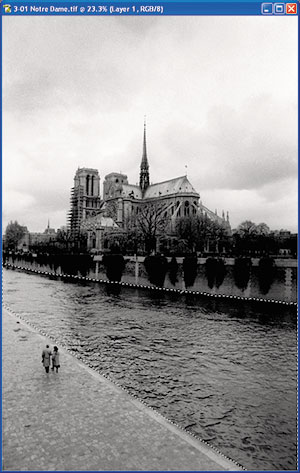
Choose any image to which you can add an obvious touch of movement—one with a river is perfect. If you’re starting with a color image, go to Image > Adjustments > Desaturate to remove the color while staying in RGB mode. This picture of Notre Dame in Paris seems appropriate, though of course the couple would have moved during the long Daguerreotype exposure time. I exercised artistic license and left them static. The subjects of original studio portraits were strapped into chairs to keep them from moving, so this is not so improbable!
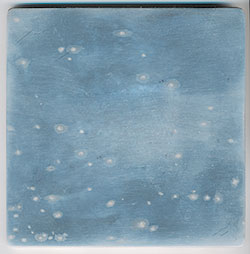
I used a steel picture frame, scanned on a flatbed scanner, to simulate the Daguerreotype’s silver-coated plate.
STEP 1
With your picture file open, identify a feature of the photograph that might move during a long exposure, and select it. Here I selected the river by clicking with the Magic Wand along the water’s edge. To make any edges between blurred and static areas less visible, feather the selection using Select > Feather and a radius of 1 or 2 pixels.
STEP 2
Saving selections adds to the file size but saves you lots of time if you need to reselect an object later. Save your selection in the Layers palette by holding down the Alt/Opt key as you click the “Save selection as channel” icon, and give this alpha channel a name that’s easy to recognize.
STEP 3
To convey the impression of movement, copy the selected feature into its own layer using Ctrl/Cmd + J, and then select Filter > Blur > Motion Blur. You can judge the angle of movement by eye, but I prefer to use the Measure tool. Here I used the tool along the nearside riverbank, read the angle indication in the Info palette, and entered the angle in the Motion Blur filter dialog. You also need to set a very high Distance value to mimic the flow of the water during a long exposure. You’ll need to repeat this process of selecting and blurring for each “moving” object.
STEP 4
Open the file with the metallic plate texture, and drag and drop the image from the Layers palette onto the main image. In the Layers palette, change its blending mode to Multiply and adjust the layer’s opacity. Multiply lets both the picture and the texture layer show through—feel free to experiment with other blending modes, and also with placing the texture above or below the image in the layer stack. Use Edit > Free Transform to resize and position the texture.
STEP 5
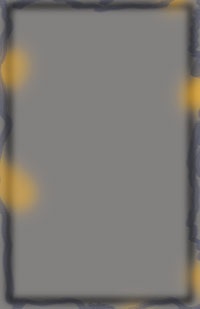
With a real Daguerreotype, the edges are unevenly stained with vivid blue and orange chemical colors. Imitate this on a separate layer. Hold down the Alt/Opt key, and click the “Create a new layer” icon in the Layers palette. In the Mode drop-down box, select Overlay and click OK.
STEP 6
Load a soft-edged brush from Photoshop’s Dry Media Brushes, set the opacity to about 30%, and then paint roughly around the layer. The colors can vary; here, I preferred more subdued tones.
STEP 7
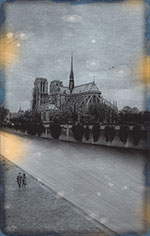
Any image is likely to need some fine-tuning after these key steps. I added a Levels adjustment layer to brighten the water layer, and reduced the metal texture’s blue color by adding a Hue/Saturation layer. In each case, you can prevent an adjustment layer affecting all layers by “grouping” it with the target layer—hold down the Alt/Opt key and click the line between the two layers. I also reused my River selection to paint on various layer masks. The finishing touches were a Curves adjustment layer to brighten the overall image, and a white border—this was a rectangular selection, the corners of which were rounded using Select > Modify > Smooth.
The world’s first photographic process was announced in Paris in 1839 by Louis Daguerre. It used a silver-plated copper sheet that was sensitized with iodine, exposed, and then developed in mercury vapor. Early images were of architectural subjects or landscapes, but soon the process was also used for portraiture, and it became particularly popular in France and America.Daguerreotypes were positive images, one-offs, and the process was obsolete within a decade, as soon as new techniques allowed multiple photographs to be printed from negatives. But if you ever get the opportunity to compare early photographs in museums or exhibitions, it would be surprising if you didn’t find the Daguerreotypes to be some of the most magical objects on display.
Early Daguerreotype exposure times were long, so moving subjects such as water and people usually appeared blurred. Photoshop’s Motion Blur filter is ideal for simulating this, but requires a little care in its application because Daguerreotypes recorded other, static objects in fine detail.
The other major characteristic of the Daguerreotype, its metal base, is tougher to imitate: the effect is as if the picture were printed onto a mirror. I didn’t have any success using an inkjet printer to print onto kitchen foil, promising though this experiment seemed, but there are ways to imitate metallic finishes in Photoshop. Certainly you need to print onto high-gloss paper rather than a surface with a matte or textured finish. The staining and other discoloration around the picture edges can also be added artificially in Photoshop, but it’s quicker and more realistic to scan real materials and use them as layers within the picture. Metallic objects will be most suitable for the Daguerreotype, but once you get the hang of this technique, you can apply it to all sorts of photographs.
 |
 |
 |
With your picture file open, identify a feature of the photograph that might move during a long exposure, and select it. Here I selected the river by clicking with the Magic Wand along the water’s edge. To make any edges between blurred and static areas less visible, feather the selection using Select > Feather and a radius of 1 or 2 pixels.
 |
Saving selections adds to the file size but saves you lots of time if you need to reselect an object later. Save your selection in the Layers palette by holding down the Alt/Opt key as you click the “Save selection as channel” icon, and give this alpha channel a name that’s easy to recognize.
 |
To convey the impression of movement, copy the selected feature into its own layer using Ctrl/Cmd + J, and then select Filter > Blur > Motion Blur. You can judge the angle of movement by eye, but I prefer to use the Measure tool. Here I used the tool along the nearside riverbank, read the angle indication in the Info palette, and entered the angle in the Motion Blur filter dialog. You also need to set a very high Distance value to mimic the flow of the water during a long exposure. You’ll need to repeat this process of selecting and blurring for each “moving” object.
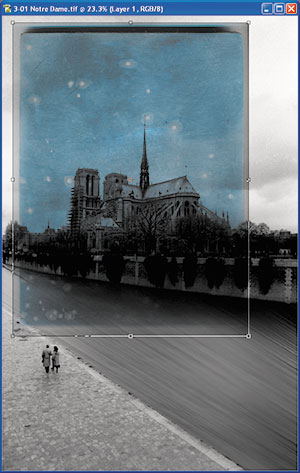 |
Open the file with the metallic plate texture, and drag and drop the image from the Layers palette onto the main image. In the Layers palette, change its blending mode to Multiply and adjust the layer’s opacity. Multiply lets both the picture and the texture layer show through—feel free to experiment with other blending modes, and also with placing the texture above or below the image in the layer stack. Use Edit > Free Transform to resize and position the texture.
 |
With a real Daguerreotype, the edges are unevenly stained with vivid blue and orange chemical colors. Imitate this on a separate layer. Hold down the Alt/Opt key, and click the “Create a new layer” icon in the Layers palette. In the Mode drop-down box, select Overlay and click OK.
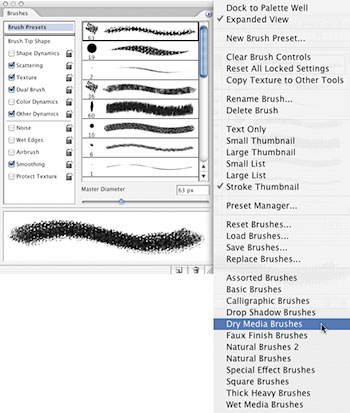 |
Load a soft-edged brush from Photoshop’s Dry Media Brushes, set the opacity to about 30%, and then paint roughly around the layer. The colors can vary; here, I preferred more subdued tones.
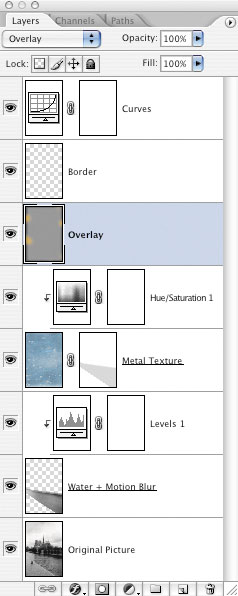 |
Any image is likely to need some fine-tuning after these key steps. I added a Levels adjustment layer to brighten the water layer, and reduced the metal texture’s blue color by adding a Hue/Saturation layer. In each case, you can prevent an adjustment layer affecting all layers by “grouping” it with the target layer—hold down the Alt/Opt key and click the line between the two layers. I also reused my River selection to paint on various layer masks. The finishing touches were a Curves adjustment layer to brighten the overall image, and a white border—this was a rectangular selection, the corners of which were rounded using Select > Modify > Smooth.
 |
No comments:
Post a Comment