Create Cool Watercolor Effects in Photoshop
Some time ago I wrote an article on my blog listing some fashion-style illustrations from really amazing designers such as Bruno Fujii, Margot Mace, Raphaël of My Dead Pony, Stina Person, and others. The coolest thing in their design work is their use of watercolor effects. So in this tutorial I will show a quick way to simulate that effect using only Photoshop and some brushes.


Next we create a new layer. Then with the Brush Tool (B) selected, choose the seventh brush from the BB Watercolor Brushes. Use black for the color. Then reduce its size to fit the document. After that, rotate and resize the layer. The idea is to create watercolor-style hair for the girl using the brush.


Now go to Layer>Layer Style>Blending Options. Again set the Fill Options to 0. Then add a Color Overlay, use Multiply for the blend mode, Green (#18ff00) for the color, and 100% for the Opacity. Then select Satin. Use the following settings: darker green (#0b9600), Darken for the blend mode, 100% Opacity, 19º Angle, 4px Distance, and 7px Size.

Again, go to Layer>Layer Style>Blending Options. Change the Fill Options to 0. Then add a Color Overlay, use Hard Light for the blend mode, yellow (#ffe400) for the color, and 100% for the Opacity. Then select Satin. Use the following settings: darker yellow (#a2a406), Color Burn for the blend mode, 100% Opacity, 19º Angle, 17px Distance, and 73px Size.


Create another layer, and make sure that the text is on top of this new layer. Then with the Rectangular Marquee Tool, create a rectangle selection and fill it with white. Next we merge these two layers (the text with the white rectangle). This is necessary to add some text effects; otherwise the filters wouldn’t work well.


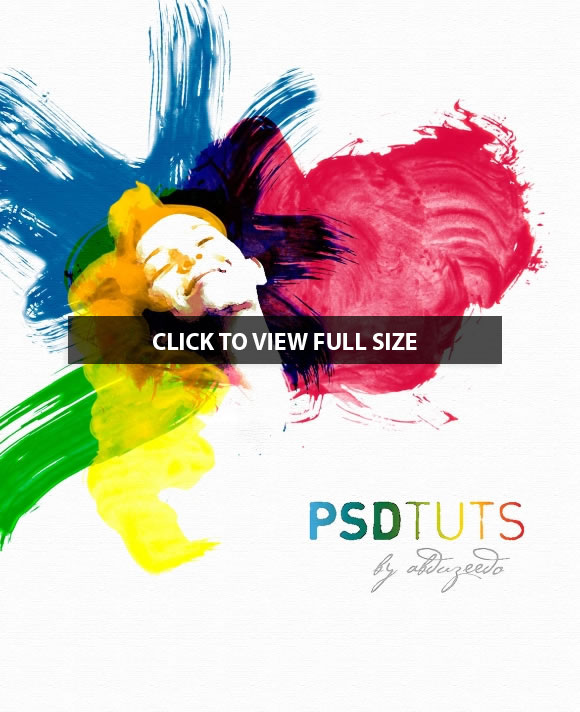
Final Image Preview
Before we get started, let’s take a look at the image we’ll be creating. Click the screenshot below to view the full-size image. As always, the full layered Photoshop file is available via our Psdtuts+ Plus membership.
Step 1
Create a new document and a new layer. Rename the layer to “texture” and fill it with white. Make sure that the foreground is white and the background is black. Then go to Filter>Texture>Texturizer, and use Canvas for the Texture, 80% Scaling, and 2 for the Relief.Step 2
Place an image in your document. The one used in this tutorial can be downloaded at this link. Then delete the background. You can use the Path Tool (P) or the Polygonal Lasso Tool (L). Tip: It doesn’t need to be perfect because we will apply some filters in the next step.Step 3
Select the layer of the girl and go to Image>Adjustments>Levels. We want to increase the whites here. Then go to Image>Adjustments>Hue/Saturation, and change the Saturation to -65.Step 4
Now go to Filter>Artistic>Watercolor. Use the following settings: Brush Detail 9, Shadow Intensity 0, and Texture 1.Step 5
With the girl’s layer selected, go to Layer>Layer Mask>Reveal All. Then select the Brush Tool (B), with black for the color, and mask the body of the girl.Step 6
We need the Bittbox Watercolor Brushes 2 that you can download at this link.Next we create a new layer. Then with the Brush Tool (B) selected, choose the seventh brush from the BB Watercolor Brushes. Use black for the color. Then reduce its size to fit the document. After that, rotate and resize the layer. The idea is to create watercolor-style hair for the girl using the brush.
Step 7
Now go to Layer>Layer Style>Blending Options. Change the Fill Opacity to 0. Then select the Color Overlay option. Use red for the color and Multiply for the blend mode. For the Opacity use 70%. Then select the Satin option. Use Hard Light for the blend mode, purple (#5d085c) for the color, 20º for the Angle, Distance 4px, and Size 12px.Step 8
Create a new layer. Then select another brush with the Brush Tool(B). I used the 17th Bittbox Brush. The concept we’re using is to design different creative-looking hairstyles. So let’s continue with that. On a new layer, paint some brush strokes in the middle of the screen. Then resize and rotate them until they look good. You should achieve a stylized hair look, as in the image below.Step 9
Go to Layer>Layer Style>Blending Options. Set the Fill Options to 0. Then add a Color Overlay. Use Overlay for the blend mode, Blue (#002cec) for the color, and set it to 50% Opacity. Then select Satin. Then use the following settings: a slightly darker blue (#065795) color, a Linear Burn for the blend mode, a 100% Opacity, a 19º Angle, an 11px Distance, and a 14px Size.Step 10
Let’s brush in some more hair. This time we’ll use green. Create a new layer, and select the Brush Tool(B). Then select another brush from the watercolor set. Select the last one, reduce its size, and paint more hair. Use just one click when brushing. After that you can resize and rotate it.Now go to Layer>Layer Style>Blending Options. Again set the Fill Options to 0. Then add a Color Overlay, use Multiply for the blend mode, Green (#18ff00) for the color, and 100% for the Opacity. Then select Satin. Use the following settings: darker green (#0b9600), Darken for the blend mode, 100% Opacity, 19º Angle, 4px Distance, and 7px Size.
Step 11
Next we repeat the process one more time. Create a new layer. Then select the Brush Tool(B). Select another brush, reduce its size, and paint more hair. Adjust it by resizing and rotating it until it looks good.Again, go to Layer>Layer Style>Blending Options. Change the Fill Options to 0. Then add a Color Overlay, use Hard Light for the blend mode, yellow (#ffe400) for the color, and 100% for the Opacity. Then select Satin. Use the following settings: darker yellow (#a2a406), Color Burn for the blend mode, 100% Opacity, 19º Angle, 17px Distance, and 73px Size.
Step 12
Now select the layer with the girl’s face. Change the blend mode to Screen. Then make some adjustments, like fixing the neck using a regular brush with a white color.Step 13
Type the text you want; I typed Psdtuts+. Then go to Layer>Layer Style>Gradient Overlay. Create a gradient using Red, Yellow, Green, and Blue. Use 180º for the angle and Normal for the blend mode.Create another layer, and make sure that the text is on top of this new layer. Then with the Rectangular Marquee Tool, create a rectangle selection and fill it with white. Next we merge these two layers (the text with the white rectangle). This is necessary to add some text effects; otherwise the filters wouldn’t work well.
Step 14
Now we apply some filters to the text. First go to Filter>Brush Strokes>Sprayed Strokes. Use Stroke Length 17, Spray Radius 0, and Stroke Direction Vertical. After that go to Filter>Artistic>Watercolor. Use the following settings: Brush Detail 11, Shadow Intensity 0, and texture 1. That will create a nice text effect, or you could experiment with different filters until you achieve optimal results.Conclusion
This tutorial presents a quick and easy way to create a nice design. We achieved this by mixing a photo with watercolor effects. We used some watercolor brushes and played with blend modes. Keep in mind though, if you can paint it for real, you will be able to create very original artwork, like the designers I mentioned before.
No comments:
Post a Comment